
How to send Gmail in NodeJS.
Nishal K
16/11/2021 
Hello All, SInce i got this blog up and running I though ill write a small blog. In this blog we will make a small script that is capable of sending gmail.
The main npm dependencies are
Using Node-mailer is most probably the easiest way to accomplish sending email,Although ill just be using gmail for sending email you can also use any other client's to send email.The purpose of using Googleapi package is to get access token once it expires and what's that?Well Gmail uses oAuth2 for authentication.
In a breif oAuth2 has two tokens,Tokens are identifiers for each user it's like a unique id given to each user when they login. oAuth2 standard uses two tokens
- Refresh Token:has a Long expiration time and is used to refresh or get new access token.
- Access Token:has a short expiration time and only last minutes, are used to access authenticated content.
What googleapi package does for us is get Refresh token once they are expired automatically.
First off,Open google console sign in if you have'nt and create a new project and name it whatever you want.
.webp?alt=media&token=bab48775-5ef6-4bb8-a6e9-50d5e46185fd)
click on New Project
Once your done creating new project navigate to that project and under APIs and Services Open dashboard.
.webp?alt=media&token=39a937f3-a60b-4f17-b08c-a09bd474653f)
APIs & Services > Dashboard
Click on OAuth Consent Screen and select User type and fill out the compulsory fields skip the App Logo and App Domain field has of now since if you do so you will need to also complete and file an application.Fill out developer contact and Click Save and Continue.You can skip the next 2 sections and yeah your done on this page.Make sure you add your email under test User (Dont miss this it will cause a 400 error later while you sign in)
Now visit the Credentials page present in the sideBar,Once your inside Credential Page click on Create Credential on top
.webp?alt=media&token=743d4019-c9f4-4014-9e7d-291b1ace5ee4)
Click on create credentials and select OAuth Client.
Select on Web Application,and under Authorized redirect URIs Add this url
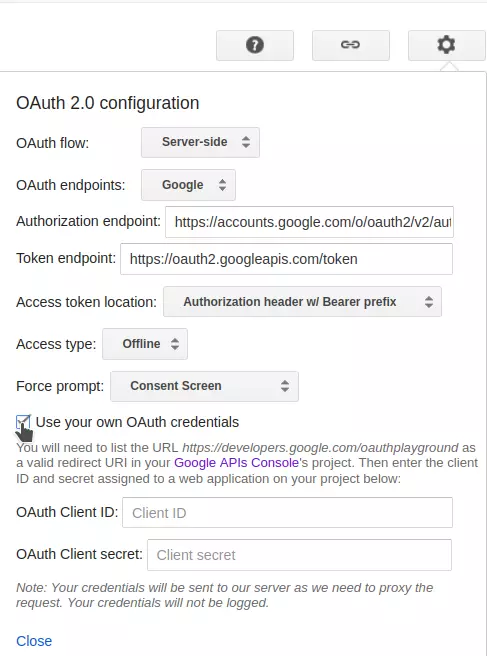
https://developers.google.com/oauthplayground make sure you don't include trailing slashes at the end and click on create an popup will open with your client ID and Client Secret Copy these and save it somewhere safe we will need this you can also find this inside your credentials OAuth 2.0 Client ID.Now open oauth Playground and select the settings icon and check the Use your own OAuth credentials checkbox and fill Client ID and Client Secret this we have obtained in google console in previous step.
In Step 1 ,Search for Gmail API v1 and click on https://mail.google.com and click on Authorize APIs.It will ask for you to login, make sure you login from the same gmail account that you have your client ID and secret from once you sign in you will be asked to give email permissions to the app.
Once your done with signing and giving permission you will be redirected to playground your authorization code will be filled you can exchange token using that copy the refresh token we will use that in our application.
Phew..... done with getting credentials now let's start with the code create a new project this can be a nodeJS or nextJS project ill be using nextJS project make sure you install nodemailer and googleapi.
npm install nodemailer googleapisWe will make a helper function called sendMail all it does is like it says send gmail
const nodemailer = require("nodemailer");
const { google } = require("googleapis");

const REDIRECT_URL = "https://developers.google.com/oauthplayground";

const oauth2Client = new google.auth.OAuth2(
  process.env.GOOGLE_CLIENT_ID,
  process.env.GOOGLE_CLIENT_SECRET,
  REDIRECT_URL
);
oauth2Client.setCredentials({
  refresh_token: process.env.GOOGLE_REFRESH_TOKEN,
});

exports.sendMail = async function sendMail(email, subject, text, html) {
  try {
    const acessToken = await oauth2Client.getAccessToken();

    const transporter = nodemailer.createTransport({
      service: "gmail",
      auth: {
        type: "OAuth2",
        user: process.env.EMAIL_FROM,
        clientId: process.env.GOOGLE_CLIENT_ID,
        clientSecret: process.env.GOOGLE_CLIENT_SECRET,
        refreshToken: process.env.GOOGLE_REFRESH_TOKEN,
        accessToken: acessToken,
      },
    });
    const mailOptions = {
      from: process.env.EMAIL_FROM,
      to: email,
      subject: subject,
      text: text,
      html: html,
    };
    try {
      const result = await transporter.sendMail(mailOptions);
      return result;
    } catch (err) {
      console.error(err);
    }
  } catch (err) {
    console.error(err);
  }
};
Yeah i kinda skipped the text option you can include it. To use it just import it and call the function as shown below.
// email is any email adress that you want to send email to
// subject: your Mail Subject
// html:your mail body in html format

sendMail(email,subject,html)
Well one application that i used, is for spamming my friend with tons of email just make use of cronjob and your good to go.
Test Token are valid for 7 days only
We have created a test token which will last for 7 days after that access token will expire and the code will start throwing unauthorized or revoked error.
Check out my other projects in my Github Repo.
nishalk01 - Overview
nishalk01 has 27 repositories available. Follow their code on GitHub.
github.com

About Author
Hello this is Nishal. I like full stack web app,with MERN being my favorite stack as of now.Currently working as Tech support @ invengers.